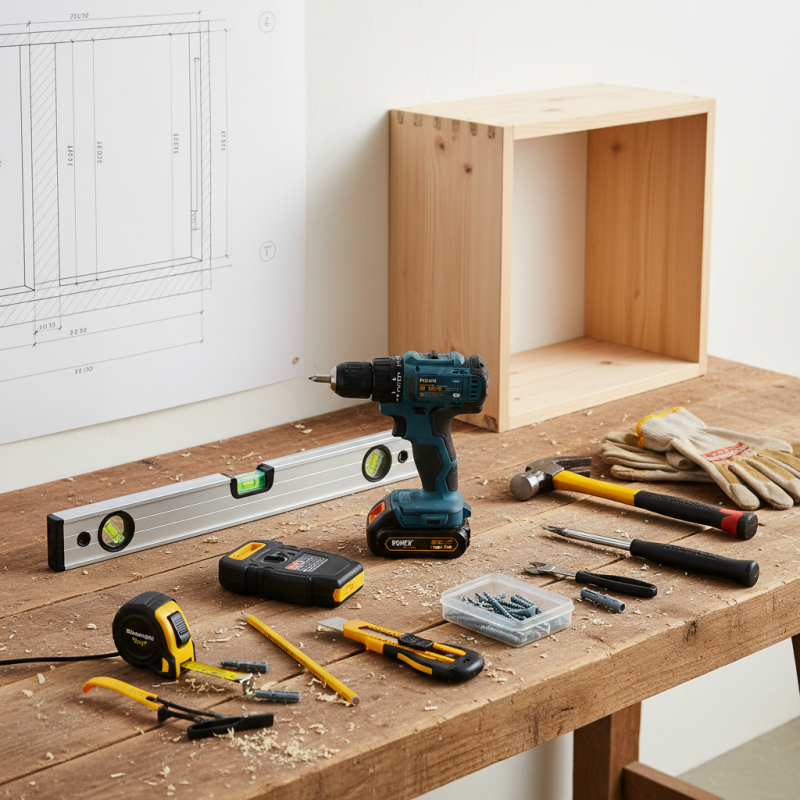
Installing a wooden shelf can greatly enhance your space. It offers both functionality and aesthetics. Yet, many DIY enthusiasts often overlook an essential aspect: the right tools. Knowing "What tools are needed for DIY wooden shelf installation?" can make a significant difference in your project’s success.
A well-equipped toolkit ensures efficiency and safety during installation. For beginners, the thought of gathering tools can be daunting. However, understanding which tools are necessary can simplify this process. Basic tools such as a level, drill, and stud finder are crucial for precise work. Each tool plays a vital role in ensuring your shelf is level and secure.
Despite their importance, many people get discouraged when things don’t go as planned. Mistakes happen, and it's okay. Reflecting on your tool selection and installation techniques can help you improve. Each project is a learning experience. Embracing imperfections fosters growth and skill development in your DIY journey.
When considering DIY wooden shelf installation, having the right tools is crucial. Studies show that 80% of DIY projects fail due to improper tool usage. A reliable level can make sure your shelves are straight. In a 2022 report by the Home Improvement Research Institute, proper leveling tools reduce installation errors by 30%. Many people underestimate this, leading to tilted or unstable shelves.
Drills and screws are equally important. Choosing the right screw type affects the durability of your shelves. The National Hardware Association states that 65% of shelf collapses happen from using incorrect screws. Additionally, a tape measure is essential for ensuring accuracy in measurements. Miscalculations can lead to wasted materials, and many DIYers forget this step.
While some may think they can "wing it" without a full toolbox, this can lead to frustration. A recent survey showed that 40% of DIYers felt overwhelmed due to missing tools. It's vital to understand the importance of each tool. Rushing this preparation can yield regret later. Invest time in gathering necessary equipment, as it ultimately defines the project’s success.
When it comes to DIY wooden shelf installation, accurate measurements are crucial for a successful project. The process begins with gathering your tools. A quality tape measure should be your first choice. Measuring more than once can save you from costly mistakes. Remember, even minor discrepancies can lead to an uneven shelf. Measuring at various points makes a huge difference.
Marking your measurements clearly is equally important. Use a pencil that shows up against your wood. This visibility minimizes confusion during installation. A level should accompany your marking tools to ensure everything is perfectly aligned. However, even with the best tools, errors can happen. Perhaps your wall isn't straight, or your measurements were slightly off. These challenges require adjustment and patience.
Taking a moment to reflect on your work can drastically improve your results. After marking, reconsider your planned placements. Do the dimensions still appear accurate? Validate your decisions. DIY projects often expose our initial oversights. Embracing this reality can enhance your skills, making each future shelf installation even smoother.
When embarking on your DIY wooden shelf project, selecting the right tools is crucial. Saws are essential for accurately cutting wood to the desired size. A handsaw or a circular saw can effectively make straight cuts. However, achieving perfect angles often presents a challenge. It’s easy to rush and make mistakes, so take your time during this process.
Shaping the wood requires finesse. A jigsaw can help carve out intricate shapes. For precise cuts, a miter saw is invaluable. Remember to measure twice before cutting. This can save you from costly errors. Sanding is another vital step. It smoothens edges and prepares the surface for finishing. Skipping this can lead to rough finishes. It’s easy to overlook details, but these make a big difference.
Experimenting with different techniques can yield varying results. Don't hesitate to try new methods, even if they feel uncomfortable at first. Your skills will develop over time. Each project will teach you lessons, refining your approach. Embrace the imperfections; they often lead to unique, personal touches that enhance your work.
This chart displays the popularity of essential tools for DIY wooden shelf installation. A circular saw leads the pack with the highest popularity score, followed by a jigsaw and miter saw. These tools are crucial for effective cutting and shaping during the installation process.
When installing wooden shelves, the right tools make a significant difference. Among these, drilling and fastening tools are critical. According to industry reports, over 50% of shelf failures result from improper installation techniques. This fact highlights the importance of using reliable tools for a secure setup.
A quality power drill is essential for creating precise holes. A drill with adjustable torque settings allows for flexibility and control. This feature helps prevent wood splitting and provides better accuracy. Invest in a drill bit set that matches your shelf material, as using the wrong bits can lead to damaging the wood.
For fastening, screws and anchors are pivotal for stability. Research shows that using the correct type and size of screws can increase load capacity by approximately 30%. Choose anchors designed for your wall type—whether drywall, concrete, or masonry. This selection can significantly determine how well your shelf holds up over time.
Tips: Always pre-drill holes to avoid splitting. Check the weight rating of your chosen fasteners. Don’t skimp on safety. A secure installation protects your belongings and helps avoid accidents.
When installing wooden shelves, the finishing touches are crucial. The right tools for sanding and sealing ensure durability and enhance aesthetics. According to a recent industry report by the Wood Products Council, properly finished wood can last up to five times longer than unfinished wood.
Sanding is a vital step. It smooths the surface and prepares it for sealing. Use a range of sandpaper grits, starting from coarse to fine. This method helps you achieve a surface that feels great and looks professional. Tip: Always sand in the direction of the wood grain to avoid scratches.
Sealing protects the wood from moisture and enhances its natural beauty. Water-based sealants are eco-friendly and dry quickly. However, they may not penetrate as deeply as oil-based options. It’s important to note that while oil seals offer long-lasting results, they can take longer to dry and may require more frequent reapplication. Tip: Test your sealant on a small area before full application to gauge compatibility and finish.
Proper preparation and sealing will make a significant difference in your DIY project. Mistakes at this stage can lead to uneven surfaces or premature wear. Always reflect on your methods and consider adjustments as you go. Your shelves deserve the best care.
: You need a level, drill, screws, and a tape measure. These tools ensure accuracy and stability.
A reliable level ensures your shelves are straight. This reduces installation errors significantly.
Using the wrong screws can lead to shelf collapses. Many DIYers underestimate the importance of choosing the right type.
A tape measure ensures accurate measurements. Miscalculations can waste materials and effort in your project.
Rushing can lead to missing essential tools. This often results in frustration and potential failures during installation.
Not pre-drilling can cause wood splitting. This is a simple mistake that affects stability and safety.
The weight rating determines how much your shelves can hold. Ignoring this can compromise the safety of your setup.
They provide control, preventing wood splitting. This feature enhances your overall installation accuracy.
Correct anchors ensure your shelves remain stable. Each wall type requires specific anchors for optimal support.
Many struggle without all necessary tools. This can lead to mistakes and a feeling of being overwhelmed.
When embarking on a DIY wooden shelf installation, it's essential to equip yourself with the right tools. A comprehensive overview of these tools includes measuring and marking equipment to ensure accurate placement. Precise measurements lay the foundation for a successful project. In addition, cutting and shaping tools, such as saws, play a crucial role in preparing the wood to fit your desired specifications.
Furthermore, drilling and fastening tools are vital for securely installing the shelves, ensuring they can hold the intended weight. Finally, the finishing touches require sanding and sealing tools to achieve a polished and refined look. Ultimately, understanding what tools are needed for DIY wooden shelf installation will not only simplify the process but also lead to a more professional and durable outcome.
TayLord Furniture