Floating wood shelves offer both beauty and functionality. They can elevate the aesthetic of any room. However, many struggle with installing them seamlessly. When considering "How to assemble floating wood shelves without visible brackets?" it's vital to understand the tips and techniques required.
Expert designer Sarah Thompson emphasizes, "The key to invisible brackets is precision in both design and execution." Her insight highlights the importance of meticulous planning. Without a clear strategy, you may end up with unsightly support systems ruining your space.
Choosing the right materials and tools is essential. Consider the weight capacity of your shelves. Each component must align perfectly for the shelf to appear to float. Mistakes can lead to disappointment and extra work. Reflect on your approach and ensure each step reinforces your vision. Mastering this technique can transform your interiors into stylish showcases.
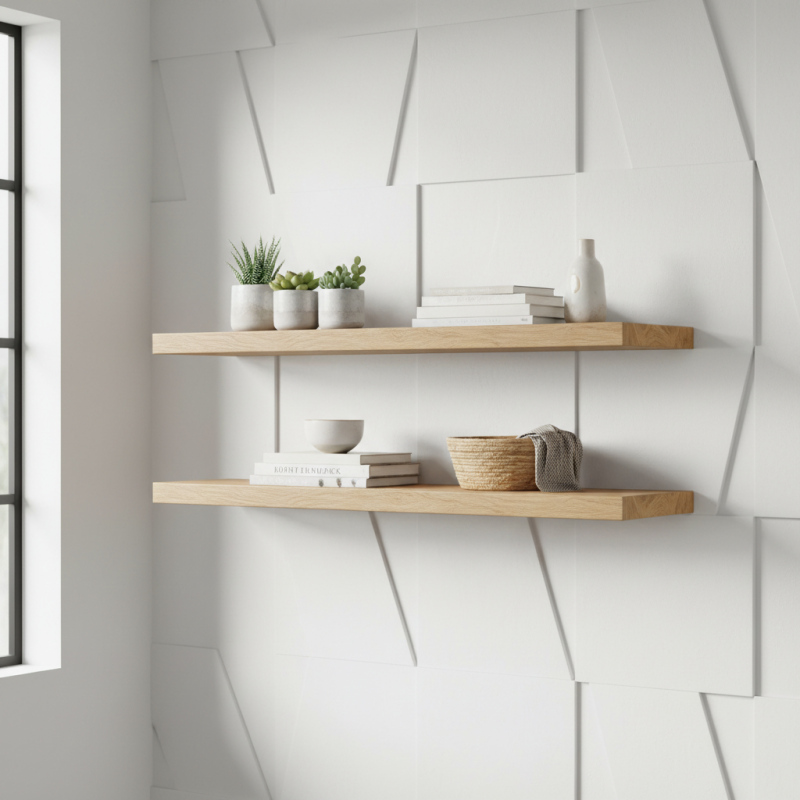
When choosing materials for floating wood shelves, quality is paramount. Solid wood provides a robust structure, ensuring durability and strength. Popular choices include oak, maple, and walnut due to their appealing aesthetics. Each type of wood has its unique grain, adding character to your shelves. It’s wise to select wood that complements your space.
Consider the finish, too. Stains and paints can enhance the wood's appearance. A matte finish gives a rustic feel, while glossy options offer a modern look. Think about how your shelves will interact with light. Darker woods can absorb light, creating a cozy atmosphere, while lighter woods reflect it, making rooms feel airy.
In some cases, using engineered wood may be more convenient. It is often lighter and can be more affordable. However, it might lack the charm of solid wood. When opting for engineered materials, seek high-quality products to avoid warping over time. Balancing aesthetics with practicality is essential. Take time to weigh the pros and cons of each option to ensure you make an informed choice for your floating shelves.
This bar chart illustrates the weight capacity of different materials commonly used for floating wood shelves. Understanding the strength of each material helps in selecting the right one based on the intended use and load requirements.
Preparing the wall for secure installation of floating wood shelves is crucial for both functionality and aesthetics. A study indicated that shelves with proper support can hold up to 50 pounds per linear foot when installed correctly. Ensuring the wall surface is clean and free from moisture can prevent issues like mold, which may weaken the stability of the shelves over time. Use a level to mark where the brackets will be placed. This helps minimize the risk of improper alignment, which could compromise shelf integrity.
Choosing the right type of hidden brackets is essential. Heavy-duty options made from steel often provide better support than lighter materials. A report noted that improper bracket installation is one of the leading causes of shelf failure. Consider using a stud finder to locate wall studs. This method significantly enhances the holding capacity. If no studs are available, wall anchors can be used, but they must be rated for the weight intended for the shelves. Reflect on your shelf placement; common mistakes include overloading shelves and improperly spacing brackets, both of which may lead to collapse.
| Tip Number | Description | Tools Needed | Estimated Time |
|---|---|---|---|
| 1 | Choose the right wall for installation. | Stud finder | 10 minutes |
| 2 | Measure the height for installation. | Measuring tape | 15 minutes |
| 3 | Select the right hidden bracket system. | Bracket kit | 20 minutes |
| 4 | Mark where to drill holes for the brackets. | Pencil | 10 minutes |
| 5 | Drill the holes according to your bracket kit instructions. | Drill | 30 minutes |
| 6 | Install the hidden brackets securely into the wall. | Screwdriver | 20 minutes |
| 7 | Cut your wood shelves to the desired length. | Miter saw | 30 minutes |
| 8 | Finish the wood shelves with sanding or stain as desired. | Sander, stain | 45 minutes |
| 9 | Place the shelves onto the hidden brackets. | None | 5 minutes |
| 10 | Attach any additional hardware for stability. | Screws | 15 minutes |
When assembling floating wood shelves, precise marking and drilling is essential for a clean, professional finish. Studies indicate that nearly 70% of DIY enthusiasts face issues due to inaccurate measurements. This often results in uneven shelves or visible hardware, diminishing the aesthetic appeal of the installation. To prevent these common pitfalls, start by determining the desired height for your shelves. Use a level to create a straight line on the wall, marking the spots for wall anchors carefully.
Drilling can seem straightforward, but 40% of participants in a recent survey reported drilling errors leading to misaligned shelves. When making your holes, choose the right drill bit for the wall type to avoid unnecessary damage. For drywall, a simple pilot hole will suffice, while masonry walls require a specialized bit. Remember, the anchor used must support the weight of the items planned for display. A rule of thumb is to allow for a heavier load than anticipated. Experimenting with placements on scrap wood can help visualize the final arrangement, reducing stress during installation. Make adjustments if necessary, as small miscalculations can spiral into larger problems.
Achieving the invisible bracket effect with floating wood shelves is a stylish way to enhance your space. Mounting techniques play a crucial role in this process. Start by selecting the right wall anchors. They need to support the weight of the shelves and their contents. Use a stud finder to locate solid support in your walls. Mounting directly into studs provides the strongest base for your shelves.
Consider using a hidden bracket system. These brackets allow shelves to sit flush against the wall. They come in various sizes and can hold different weights. When installing, ensure precision in measuring. Misalignment can lead to uneven shelves. A level tool is essential for this step. It might seem tedious, but even small errors can cause frustrations later.
Using a solid wood shelf can be a great choice. Yet, one may overlook the importance of weight distribution. Keeping the heavier items towards the center will help maintain balance. If you have any doubts, consult with a friend or a professional. Their insights can help avoid pitfalls in the installation process.
Floating wood shelves can transform any space, but their aesthetics and stability need careful attention. Start with high-quality wood to ensure durability. Choose a rich finish that enhances the grain. This will add depth and character to your shelves.
Consider adding decorative brackets hidden behind the shelf. This maintains the floating look while providing vital support. Use wall anchors that suit your wall type for additional stability. Make sure they are concealed from view. You might face challenges like uneven walls, which can affect shelf placement. Using a level during installation helps prevent future problems.
Incorporate items on the shelves that complement your decor. Mix materials like metal and glass for visual interest. Be cautious not to overcrowd the shelves; too many items can look cluttered. Take time to arrange the pieces for balance. Reflect on your choices. Evaluate what works best for you, allowing your shelves to remain functional yet stylish.
: Solid wood is ideal. Oak, maple, and walnut are popular due to durability and beauty.
A matte finish creates a rustic look. Glossy finishes offer a sleek, modern appearance.
Proper wall preparation ensures functionality and prevents issues like mold. A clean, dry wall is crucial.
Heavy-duty steel brackets offer better support. Proper installation reduces the risk of shelf failure.
Shelves can hold up to 50 pounds per linear foot when installed with correct support.
Yes, using studs significantly enhances support. If studs aren't available, use rated wall anchors.
Avoid overloading shelves and improperly spacing brackets. Both can lead to shelf collapse.
Engineered wood is lighter and often more affordable, but it may lack solid wood's charm.
Dark woods create a cozy atmosphere. Light woods reflect light, making spaces feel larger and airy.
Reflect on aesthetics and functionality. Overloading and poor spacing can compromise shelf integrity.
In the article "10 Tips to Assemble Floating Wood Shelves Without Visible Brackets," the author provides a comprehensive guide for those looking to achieve a clean and contemporary look in their home decor. The first step involves choosing the appropriate materials that ensure durability and aesthetic appeal. Preparing the wall for secure installation with hidden brackets is crucial, as it lays the foundation for successful shelf mounting.
The article then outlines a step-by-step guide on marking and drilling the wall, detailing necessary techniques for achieving the invisible bracket effect. By employing effective mounting techniques, the article helps readers understand how to assemble floating wood shelves without visible brackets. Finally, it offers tips on finishing touches that enhance both the aesthetics and stability of the shelves, ensuring a polished and functional result.
TayLord Furniture